Monday, July 9, 2012

Cheap Art

This was a pretty cool project but I didn't have canvas and didn't want to buy any so I substituted a large (ish) piece of cardboard instead. So first I painted it whatever color I wanted. I chose a new purple I'd just found in the clearance aisle at Wal-mart.
I have been collecting the empty toilet paper rolls from the bathroom each time we run out. I have been seeing tons of projects that look easy and cute (like this one). Let me just say it's super easy for me to get the toilet paper roll because I am the only one who knows how to change it (apparently), but if you live with women then you should let your roomies know to keep the rolls. This project only took two rolls but I'm still saving them for whatever projects I come up with next. I flattened the rolls and placed a ruler on top then made a mark at even intervals depending on how thick I wanted my project. It's kinda hard to see but its .5 inch red marks.
Then I cut both rolls into strips. I formed my design on the ground first before hot gluing the pieces together. Then I painted them a second color that I liked with the purple.
Once all of my pieces dried I hot glued the pieces together in the places they belonged. With pieces like the flower the glue will dry before you can get glue on all of it so I placed glue on the five ends.
Once the project was done I nailed it to the wall placing the nails in places that aren't noticeable like in the middle of the flower and the corners of the petals.
And it's finished! I got the idea from one I saw online. There are many more that I have liked so I will probably do some more. Like I said I think this would look way cooler on canvas. I would have loved to make it huge like in the example that I saw. I've got a lot more projects on the way so keep checking. I'm going to start a weekly art journal soon that will take about ten minutes a week. SO get a deck of cards!! and come back soon!

Saturday, July 7, 2012

Always Waiting

So this post is not going to be crafty but don't worry I've got a list of things to blog about. This is more of a "You need to learn this" post. Its about how to tip you wait staff. Now I'm sure many of you think you know how to do this....but you probably are wrong. No offense.

Let's just start off by saying I am a waitress so this applies to me and that's why I think its important. It is very possible and probable that you, your children, and your grandchildren will at some point have a waiting job as well. Therefore it applies to you too.

I know that the general rule to go by is 10-15%. This rule sucks. At my job we are required to claim 12% of our total sales as tips. So obviously if everyone tips 10% I won't make that line. Which means I will need a managers approval to claim the tips that I did make and it will look like I didn't claim all of my tips. Now I'm not saying I'm a bad waitress. There are many times where I make more than that 10-15% but it's annoying when one or two tables ruin my whole tip percentage. If your waiter/tress does a good job, tip them the most that you think they deserve. Don't be cheap. As a waitress I make $2.15 an hour. How much do you make? because I'm pretty sure it's more than that. You can argue that there are nights when I make more than minimum wage, which is true. But let's be honest, with this economy not as many people can afford to go out to eat. There are far more days where I don't even make minimum wage because it's slow and there aren't a lot of customers.

Now, I want to touch on a stereotype. Two actually. Old people and young people. The stereotype is that you suck at tipping. One dollar does not a tip make my old friends. The wait staff dreads when you come in and dreads having you as a table. Change this stereotype. Prices have gone up. I know you've noticed. This means that the tip should go up as well.

Here is something that particularly irks me. If you have a coupon, or kids eat free, tip as if you didn't. At my job we have a night where kids eat free. So it's annoying when a table of 6 comes in, 4 of which are kids, so their bill that would be $60 is only $20 and they tip you for the $20. I did $60 worth of work for you especially since kids tend to take more patience so please tip accordingly.

No one waits because they like it because no one likes it. It isn't a fun job and people aren't fun to wait on. I know at some point you've had to deal with a mean/bad/annoying customer. That's almost a daily thing for a waiter especially at a popular restaurant. So tip well from now on.
Very good movie by the way.

Monday, July 2, 2012

Toga Toga!!

My boyfriend is apart of a fraternity on campus. Towards the end of the year the fraternity had a Toga party. He left me up to deciding on the togas. I decided to go on the "famous couples in history" route and play off our whole boyfriend/girlfriend thing since many of the guys and their dates weren't actually couples. I had a whole list including mickey/minnie, knight/princess, classic caveman/woman but finally my friends helped me decide on this:
Can you see it? Most people got the right show. Pebbles and Bam Bam!! Dorthy and Tin-man were a close tie. I'll use them eventually.
So here's how I did this awesome costume for pretty cheap.

Pebbles
Pebbles was obviously pretty easy. She actually has a lime green dress with black triangles like Bam Bams but I figured I could get away with white circles. I can't remember how much I bought but I ended up only using half. I cut the fabric in half length wise and sewed two ends together to make it longer. I decided on my length by, in the store, estimating how much fabric would be needed to wrap around me, I should have bought half as much. To wrap the dress I started by hanging a piece over my shoulder with the short end reaching just past my waist in the front and the long part hanging in the back. I then started to wrap starting at the top and going around to the front, over the short end, and continued wrapping down my body until I got my desired length. I overlapped for most of the fabric. I tucked the end up (which you can see in the picture on your left) and used a safety pin to hold it in place. Any places that were loose also got a safety pin. I used a shell necklace and a felt dog toy as accents to the outfit. To put the bone in my hair I put it up in a very high ponytail. I took two pieces of hair and pulled them forward placing the bone up against the hair-tie. Then I wrapped one piece of hair on one side of the bone and safety pinned the hair in the back. I did the same on the other side.

Bam Bam
Bam Bams was way harder. I couldn't find any fabric with black triangles so we bought just plain fabric. I bought a piece of sale fabric in black and cut it into little black triangles. That's right. I put those triangles on by hand. I didn't sew them thank god. I bought fabric no stitch gel and used that to quickly apply random triangles everywhere. I also applied them to the hat. The only reason the hat is even apart of the outfit is because my boyfriend has a thing for hats. Bam Bam does have a hat but it's not a necessity. Wrapping Bam Bam was pretty much the same as Pebbles. More chest is shown so wrapping doesn't have to start as high. As you can see the shoulder depends on the personal preference. My boyfriend wanted his on the left to cover some scars.


I probably spent 2-4 hours making these costumes and another hour putting them on both of us. Now I love KU but it's my luck that they made it into the basketball Championships about 30 minutes after we got our togas on so no one stayed for the party. And they couldn't even win the Championship for goodness sake! That makes me very angry. If they had won it all I wouldn't be as mad.  I will definitely reuse these costumes. This wrapping technique held up way better than many of the others I saw at the party. People were constantly having their togas fall off. Also, it looks like all we have on are togas. Underneath I am wearing a strapless shirt and spandex shorts. Plenty of girls did the same but theirs could be seen. I've also seen togas in a halter style using a similar technique. Rather than draping behind one should go back over the other shoulder and then start wrapping.


Toga Toga Toga!!!

Saturday, June 30, 2012

My kitten made me do it...

This is not going to be a crafting post. Sorry to disappoint.
So you may or may not have heard that my boyfriend and I recently adopted a kitten from the Lawrence Humane society (Go adopt yours: http://www.lawrencehumane.org/). We had trouble on deciding which animal and of what species to adopt. He fell in love with a grey tabby named Tom. Tom was a five month old, active, playful kitten. He was also $75. Obviously Tom was not meant for us. We went on a Thursday so cats older than 6 months are free plus you receive a free collar, a free bag of food, and the cat is micro-chipped for free so it can be tracked if ever lost (go here http://www.lawrencehumane.org/ or find your humane society).
I am not one to jump into a decision. Sure, I jumped into getting a pet but deciding on the specific one was tough. Especially after I saw Dozer. Dozer is a dog that was left by his owners on the side of the road. Not only that but Dozer was left by people who had previously adopted him from a Humane Society. He looked so sad. It reminded me of my first puppy, Romeo.
After settling that no, we weren't going to buy Tom or Dozer since both cost $75, we had to choose between two very similar cats. The problem with choosing is that we each chose one cat and wouldn't budge. We walked around trying to decide and then I found her. We had just walked into Cat-topia where all the cats roam free and the cutest of little black cats walked by. It didn't take much time and we were on our way home with our Phoenix. We kept the name that the Humane society gave her.

So this lovely story of how the newest member of our household came to be brings me to how my cat drove me crazy. Phoenix is fully housebroken. She was cleared with a clean bill of health at her check up. So you can image my annoyance that she continually goes to the bathroom on the carpet in front of her litter box. This has been going on for about a week now. All we need to do is make it to Monday and then she is going to the vet, and this is why. Her litter is clean and new. We thought that maybe she was mad that we kept her locked in our room while we weren't at home so now we've been leaving the door open. Still using the carpet. She also has been dragging her butt on the carpet which has been going on for longer than a week so maybe she is trying to tell me something. Either way it's not her fault. I understand. But after working a double shift and then coming home to her presents on the carpet for the second time today you can imagine my annoyance. I snapped. I came home, saw it, got pissed. As soon as the carpet was clean I nailed a towel to the floor. Now you might say "why on earth did you NAIL a towel down??". Well here's my reasoning. I've put a towel down before and she just goes on the towel which is great. Exactly what I wanted. The thing about Phoenix is that she isn't dumb. She's actually a really smart kitty. She knows that we'll be mad. My boyfriend is just as annoyed with her. So she covers it up like I won't notice. She pulls rugs, towels, nearly anything she can over it to cover. She even pulled my hair straightener of the dresser by it's cord once (the horror!!). As you can tell I am annoyed and I refuse to deal with it anymore. So I nailed a towel to the floor. I have no advice other than, if your cat is dragging it's butt on the floor take it to a vet.

Friday, June 29, 2012

Rental Horrors

This is the project that I am the most proud of and I get to see it every day!
Recently, my boyfriend and I began renting a room out of a house with other college kids. Specifically boys. Before we moved in there were five guys (burgers and fries?) living here. So, needless to say, this place was disgusting (sorry if any of you are reading this).
When we moved into the house we noticed that everything is pink. Ugly pink. The rooms, the bathrooms, the kitchen cabinets. It's so strange. I guess the story is that the owner's of the house let their two little girls paint their rooms and the bathroom whatever color they wanted. And apparently they didn't help them paint it, at all. I have no clue what happened to the kitchen but that explains the paint job in the rooms. The nails and plug-in covers were all painted the same pink. The air vent on the wall was pink too. The worst part? Not only did the girl who lived in our room paint over tape but she painted over dust. Actually, to be more accurate, a spiders nest. I got the privilege of cleaning up dead baby spiders that were trapped until their death in their own egg sack. Aren't rental horror stories fun?
Anyways, I had this vision. I decided to get crafty. The room is mostly for my boyfriend so I decided on the colors of beige and navy blue. It's a pretty dark navy blue. We spent a few days painting the entire room beige. Three walls took two coats. I wasn't sure what to do about the ceiling. I didn't want to paint the whole ceiling but the girls didn't tape anything when painting so there was a lot of pink on the ceiling. We decided to just paint over the pink with beige since it wouldn't be THAT noticeable from afar.
Okay, enough talk. Here's the fun part. It'll be easier to show you.
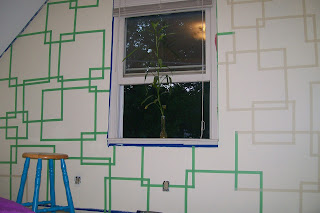
I did this (by myself) while my boyfriend was at work. I intended to surprise him with it since he had no clue what I was trying to describe to him. It was pretty funny. Every time someone would ask about the paint job he would describe it to them wrong. I would correct him and then the next time he tried to describe it he'd get it wrong in a completely different way. I digress. Like I said, we painted all of the walls beige but, since most of this wall was going to be covered up, we only did one coat on this wall. I ran out of tape half way through the wall and had to walk (my boyfriend had my car for work) to the hardware store (that ended up being closed) and then Dollar General to get tape. It didn't matter if it was the same type of tape, just the same thickness. I was worried that the tan tape, which wasn't painters tape, wouldn't work as well but it worked just fine. All of these boxes were free handed so some of them are a little crooked but it kind of added to the look, like it is supposed to look that way.
After making all of the boxes I used a roller and painted blue over the entire wall. I used two coats to make sure it covered. This whole project didn't take that much time but I had to wait for the paint to mostly dry before peeling off the paint (in case I needed to paint over a few places). I think this is the perfect accent wall for our little room. This wall is the biggest of all of the walls and isn't broken up by doors or the closet. You can kind of see in the left corner of the picture that our ceiling slopes so all of our other walls are short.
This is the end project and my boyfriend. Both cleaned up nicely don't you think? We painted all of the other baseboards blue as well as the doors because, again, they were all pink. That explains why the window, which wasn't pink, is also blue. It really doesn't make sense that the only thing that wasn't pink was that window. All well. My next painting project is the bathroom which is a slightly less disgusting color of pink but I think that the left over beige will cover it since it's so small.

Some cool alternatives to this project would be diamonds rather than squares. I am a big fan of accent walls. Stripes can also be made. I am a fan of many different sized stripes on one wall but that's just me. Any two colors can be used. Always do a light and a dark or a neutral and a light/dark. Never two dark colors, because the room will be dark and depressing and never two brights, because it will be blinding. One day I want to do a brown diamond wall in my living room. I will probably use beige again but have orange accents throughout the room.

Wednesday, June 27, 2012

Dream Big

So this is a project that I did for school. The one I made isn't very crafty but I really liked the idea and have a few ways that it could be made more appealing to the eye so I'm ognna go ahead and share it.
This is my dream board:
This would be a good project for a rainy day or with kids. The way we did it in class was to make a list of 5 dreams that you hope to complete within the next year, 5 within the next 5 years, and then 3 for the next 10. I really didn't like the "within a year" part because I didn't really have anything important I wanted to do. I used things like go to college (which is important but I knew I would do it already), get clear skin, get healthy, and things like that. Honestly, I didn't even attempt these goals. They just weren't that important to me. It's the other ones that meant a lot. I've had dreams of traveling and a son for a long time. It's was important to me that they go onto my dream board. All of my pictures were cut out of magazines and glued onto a piece of constriction paper. My teachers laminated it and it hangs on my wall today.

This project is pretty plain. So I came up with some ways to make it look prettier.

1. I have seen online where people have taken cookie sheets, spray painted them, and then used them as a magnet board. The same idea could be used for this. Remember, the idea is your dreams from now so don't change the dreams out. Just add on new ones as they develop.

2. A shadow box from Hobby Lobby would be a great idea. This way not only pictures but actual objects could go into your dream board (box). If I had made a shadow box then I would of included a miniature Eiffel tower since I have always dreamed of going to Paris. Use scrapbook paper to decorate the background of the shadow box.

3. Goodwill has a lot of large, cheap picture frames. Buy one and remove the picture as well as the glass from the frame. This leaves the cardboard backing to the frame. Cover the cardboard with scrapbook paper and attach the pictures of your dreams. It's the same idea as what I made, just better looking.

Basically all of these have the same idea: give yourself a visual of your dreams to see daily. This makes you remember them each day and will most likely cause you to think about how to achieve them. For instance, lately when I've seen my board, I have thought about my trip to Washington that I am working towards. I hope to be at the Presidential inauguration. No matter what your dreams are just give yourself a daily reminder to help them along. Don't let yourself forget about them.

Monday, June 25, 2012

Shoes! Shoes! Shoes!

Alright, so here is another project that I absolutely loved!!! A while back my sister was getting rid of a lot of her clothes and such. First, she came to me with her unwanted clothes to see if I wanted any. She had these heels.


I really love shoes and will pretty much take any I can get so I grabbed a hold of these. That was a while back and I have yet to wear them today. They're cute but the black/brown combo makes me unsure and I don't wear a lot of brown anyways. Then I saw a tutorial on pinterest for painting your heels. I really wanted to try it so I decided to use these as my Guinea pig.

What you'll need:


1. The first step to adding some color to your heels is to use rubbing alcohol to clean the bottom of the shoes. My shoes have ridges in the bottom so I made sure I was extra careful and cleaned them well.

2. The second step is to cover the bottom of your shoes in a layer of white nail polish. It doesn't have to be thick it just needs to cover the area you want to be colorful. I used a regular paint brush to cover the bottom quicker. This ruined my brush. The tutorial said that nail polish remover would get rid of it but that's not true apparently. Luckily I have cheap brushes.
My shoe is hanging on and upside down stool to dry.

3. Once the white is completely dry you can begin to cover with your second color of nail polish. This will be your final color. You will probably need two or three coats to cover it completely. Remember that the shoes will be viewed from afar so it's not super important that the color is thick.

This is my end result. I think they're super cute now. I chose pink because it matches most of my "Going out" outfits. It also was my most popular nail polish color and this project takes a good portion of the bottle so I wanted to use something I have a lot of. There were some spots on the underneath of the shoe where paint got onto the black that I didn't want to paint. I just used a black sharpie (!!!) to cover up these spots as well as any scuffs. The shoes look great now!

My boyfriend James has been bugging me to write a blog post about him. So I'm just going to quickly include that he is the weirdest guy I have gone out with but also the most interesting. He changes the words to the music of songs and sings to me. They don't rhyme and hardly make sense but its cute. We have a kitten named Phoenix and, before we got her, he promised he would clean out the litter box every day and that I would never have to if we got a kitten. Now that we have her that's completely changed. He complains every time I ask him too, but it's worth it because she's pretty great too. That's pretty much all I have to say. Just trying to embarrass him as any good girlfriend would.