I haven't written in a while and I sincerely apologize for that. Moving and finals have taken up the last few months of my life. And drama. yay.
I think I would like to talk for a minute or so about this time of year and the affect it has on me.
Christmas time is my absolute favorite time of year. I love to give gifts. For several years now I have bought for an "angel" or a "mitten". You know, the trees at the mall that allow people to shop for children, and sometimes adults, who can't really afford a Christmas. This year is the first year since I was 16 that I haven't been able to do that. Unfortunately it just isn't in my budget. I think that's part of why this holiday season has been so hard for me, mostly on an internal level. This is the first holiday season where I'm really on my own and, unlike previous years, I have things to pay for, like a real adult, and that means less room to buy for others. Of course it isn't all about the money. I can always, and have been doing nice things for others but it doesn't give the same feeling as gift giving.
This year is also hard for me because, since I'm on my own, that means working over the holidays. not Christmas day but the surrounding days. For me, this means I won't be home for the holidays. I remember the only other time I ever spent a Christmas away from my family, and really it was only Christmas eve through morning. I traveled with my boyfriend and his family to spend Christmas eve with their family in Oklahoma. We were only supposed to be there for a few hours but a huge snow storm and a scary car accident caused us to be stuck there until Christmas morning when the tractors plowed us out. I remember how hard it was not to cry. I'd never spent a Christmas away from home and it felt like the end of the world to me. Obviously it wasn't and my family waited for me to come home before opening presents but I was just a kid. And, it hasn't been that long since then. I'm still a kid. At heart if not in life. And I know that this year will be hard on me. If the world doesn't end, of course.
Another hard thing about the holidays, and it isn't just this year but every year for as long as I can remember, is that it's almost the end of the year. This gets me thinking about a lot of things that I thought would happen but didn't, things that should have been but weren't, and where I thought I would be versus where I am. Let me tell you, this is not at all where I thought I would be. Not even close. But, just like I do every year, I have to remember what I am thankful for. My life may not be where I thought it would be but it's a lot better than it could be and it's far better than it was through most of this year. As I've said before, this year wasn't good to me. At least at the end it's looking up and I have some really great, new people in my life.
The Holidays for me are about family. If you're with them this year be thankful, you might not be next year (not to insinuate your or anyone else's death).
Some ideas about quick Christmas gifts for those you forgot and don't want to leave out.
Cool lights for little kids:
http://shannoneileenblog.typepad.com/happiness-is/2010/03/cloud-lights.html (instructions in comments)
http://www.apartmenttherapy.com/at-europe-paris-6-32062
http://weheartit.com/entry/3662515
Harry Potterhead ideas:
http://practice-self-love.tumblr.com/post/22781935572
http://www.etsy.com/shop/OpheliasGypsyCaravan?sold_listing_id=92084150 (can be DIY with sharpie, dollar store mug, and oven at 350 for 30 min)
Little boy DIYs:
http://www.attemptingaloha.com/2011/11/day-9-handmade-christmas-gifts-for-boys.html
http://www.finleyandoliver.com/2012/03/diy-lego-travel-box.html
Wednesday, December 19, 2012
Monday, October 29, 2012
Son of A Biscuit Eating Bulldog!
Interesting tittle, no? I used to love those orbit commercials. Dirty mouth? clean it up!
 I recently moved so I don't have many crafty things to share with you all today....so here is a picture of my adorable kitten, Marly! She climbed up those clothes. Someone talk me out of declawing her please because it's looking more appealing each morning that I wake up to her having shredded a brand new roll of toilet paper.
So I really want to talk about something near and dear to my heart and I'm sure many of yours though you try to hold it in. Don't!! Let it out! Scream and bitch and whine about it until the madness ends!!! But really guys I'm talking about this whole sub-tweet/ vague facebook status thing. It needs to stop.
Some of you, at least everyone under 25, knows what I'm talking about. Most of you have probably done a little subtweeting yourself. That's alright. I have too. We are all human. We all get emotional over others and feel the need to vent about it. These social media cites are not diaries. Don't spill your guts and think that not using someone's name is going to make it less obvious.
Here are some wonderful examples to get my point across:
1) I have a friend (I am refusing to mention any names here but I'm sure she will know who she is and subtweet about it) and she really liked this guy. A lot of drama went down between them. I won't go into the dirty details but now she is subtweeting him constantly. He is also one of my friends and we have talked about how he feels about it. It's creepy. Legitimately he feels stalked. They weren't together that long so it's just weird. But even if you have been together for a long time and something happens. DON'T DO IT!! That person will know. It just makes you look pathetic. You shouldn't be sitting at home whining about them anyways Go out and move on. Don't pine away for them. Now I know that I have done this. Not often but I do. Many times after I have done it, I delete the status or tweet. It's especially easy for me on twitter because he doesn't follow me, but that doesn't make it alright.
Example two is a bit more annoying.
2) Basically my friend and I got in a fight. Drunken and stupid I lied to her and drama unfolded. In her sober mind everything was clear but I don't think she took my state of mind into consideration. Honestly, it should not have been as big of a deal as it was/is. It was only a few days ago but it is just getting worse. I have seen at least 5 subtweets about me and one facebook status that I know involved me. It's especially obvious since she is hashtagging (#) something about best friends with every one. Where I should be sorry it just makes me angry. She is dragging this out and making it a huge drama when all it really needs is an apology and a hug, which I have given several times I might add.
So look at these from my and my guy friend's point of view. Now think about how dumb you look when you subtweet someone else. Honestly, after each subtweet I feel more pathetic no matter if I am mad, sad, or something else. It's showing that that person is on your mind when they probably shouldn't be.
I would say the only exception is things like "I love him" or things like that. But that's sickening so I will unfriend/follow you if I see that shit.
This is why I gave up Facebook the last time.
Now for more Marly!

"How childish to make a big deal out of nothing"
"I'm mature enough to forgive you, but I'm not dumb enough to trust you again."
"I'm so glad we didn't date"
Friday, October 5, 2012
2012 as Me
I haven't written in a while and I apologize for that. I also underestimated how much I would want to say on a blog. I feel like this is less of a pinterest/craft blog and more of just a me blog for me.
To start off, I saw a pin on pinterest about soaking candy in vodka to make flavored vodka. How perfect, right? Wrong. First of all, the flavor is over powering. And, for some reason, when I thought of candy vodka I thought it would taste more like candy and less like vodka. Nope. The vodka is still there. It's not something you'll want to straight drink (bad idea, trust me). It's more of a shot. I don't know why I thought it wouldn't be. Mistake on my part. So this is just a fair warning.
This year has not gone well. If 2012 is the end of the world (which it isn't) then this is a sucky last year for me. I don't know if I've just made bad choices or what I've done to create such a mess.
To start off 2012 my 'boyfriend' or I suppose he would prefer that I say the guy I was seeing, left to study abroad. We weren't 'together' but we weren't not together. It was one of those things. You know what I mean. You can ask my friends, that hit me pretty hard, but I won't linger on THAT. There's more sadness to talk about still!
I've never been one to be single long. That's not to say that I'm really pretty or that I like 'rebound guys', I don't. I've just never learned to be alone. I think it goes back to my relationship with my dad. Also, my first boyfriend and I were far from a healthy relationship. When I say first boyfriend I'm talking serious boyfriend. Not like in seventh grade when I got my first kiss and called him my boyfriend (not even a real kiss). So shortly after study abroad guy left (Elliot as my friends call him) I began seeing someone new. I think subconsciously I was trying to move on but really my feelings just transferred My friends even told me that they were afraid that would happen, and they were right. I know now that I should have taken more time for myself. I should of found out who I am without a guy before jumping to the next one. My relationship with 'the next one', we'll call him the wrestler for blogging sake, has been a lot of fun. We have a good time together.
I moved in with The Wrestler at the beginning of the 2012 summer. I didn't want to go home and neither did he. It was supposed to be a temporary thing. We both worked at jobs 20 minutes away in opposite directions. We adopted a cat for free from the Human Society. Life was good. For a little while.
The Wrestler took his car to a body shop to fix some cosmetic damage. Later, the engine caught fire while I was driving it. So we were out a car. He would borrow mine if I didn't work or pay to borrow someone else's if he did. We got by.
The alternator on my car went out. The Wrestler and my brother-in-law fixed it with little expense to me. There was about a week that we were both paying to borrow cars from people. What happened to REAL friends?
The next month I got a speeding ticket. Ironically, I was speeding because I was borrowing my mom's car that doesn't have any headlights. It was getting dark and I didn't want to blind the people in front of me with my lights. I was trying to pass them to avoid pissing them off. My bad.
In the beginning of October I decided I needed to move out. The RA job I had lined up with the school didn't work out and I stayed with my boyfriend. Let me tell you that living with four guys is no easy task. Especially when they aren't your children, or brothers, or related to you in anyone. If you don't have to love them because they're related to you then you probably won't. Let's be honest.
In the beginning of September, my boyfriend was T-boned at an intersection in my car. He is fine but my car is totaled The man didn't have valid insurance and my insurance company can't seem to get a hold of him using the fake telephone number he provided. Weird how that doesn't work.
Last week liquid was spilled (not by me) onto my computer. Hopefully Best Buy will have good news that the speakers are all that needs to be replaced.
My mom is moving out of our current house and can't keep my cat. That makes three for me. I'm slowly becoming the crazy cat lady.
That's a whole lot of complaining to do in one blog and I strongly apologize. I've watched Bridesmaids over and over again and I've started comparing my life to hers. Not a good idea. BUT she gets a happy ending so I will too, right?
To counter all of this sadness here is a list of good things that have or will happen to me this year:
I adopted TWO new babies (cats). I'm happy to be a cat lady.
I got a new (to me) car fro a great deal
I did get a new computer to replace the old one
I've lived on my own for 6ish months and haven't died. That's and accomplishment in it's own.
I ended my Freshman year of college and Started my Sophomore year off with a BANG!
I'm still awesome.
There are other things. Most definitely (I can never spell that word right). Sometimes it's just hard to focus on the positive when the negative are so bad. And sometimes, the negative are so bad that you have to focus on the positive. 2013 will be better. Not instantly. That's what the end of 2012 is for. To get to better. The positive.
Monday, August 13, 2012
I love Colors!
I am a huge fan of colors. Bright ones. I love the idea of having a turquoise bookshelf or a pair of bright yellow heels to wear. I like to stand out and to do so need something that POPS! So on pinterest I have been seeing some cool colored clothes and thought that maybe I could make some myself.
Here's what I used:

And a pair of jeans that I wanted to change. I chose these jeans because I don't wear them very often and they are a little snug on me so I won't be upset if they turn out terrible.
First I filled the bowl with water. This whole process would have worked much better in a sink or bathtub but I don't have a plug for my sink nor do I have a bathtub. I poured a lot of bleach into the water. No measurements just guesstimating. I didn't notice but the bleach was lemon scented. This gave the jeans a yellow tinge once they were completely bleached.
 I submerged the jeans into the bowl and let them sit for over 24 hours. It surprised me how long it took. You can see in the picture where the jeans have started to yellow. When they were completely bleached I let them dry completely by hanging them up over the same bowl (to catch dripping water).
 The yellow tint doesn't actually affect the end result but is just something to consider. I used the same bowl, refilled it with water, and added some of the RIT dye. I didn't measure. Depending on how dark the jeans got I would add more. Remember, you can only add more. None can be subtracted so use sparingly.
 I'm not sure how long I let them sit but I made sure to check on the color and stir them every so often. When they got to a color I liked I let them hang dry again. Then I put them through the washing machine and dryer by themselves.

 When I first decided I liked the color they were a darker pink. After washing they turned out coral which is even better. They're gorgeous in person. It's a pretty easy process but I'd never thought about changing the color of my clothes before. I have a hoodie that I am trying to transform into something magnificent and I think I am going to use this same process to get rid of the boring grey. Enjoy!
Here's what I used:

RIT dye (from Hobby Lobby) in my chosen color of scarlet, a large bowl, and bleach (not shown)
First I filled the bowl with water. This whole process would have worked much better in a sink or bathtub but I don't have a plug for my sink nor do I have a bathtub. I poured a lot of bleach into the water. No measurements just guesstimating. I didn't notice but the bleach was lemon scented. This gave the jeans a yellow tinge once they were completely bleached.


Saturday, August 4, 2012
I bet you didn't know!
I haven't posted in a while, sorry about that. Bigger things took my attention momentarily. But I'm back now with a list of tips you probably will want to know at some point in your life. There are a lot of these lists on pinterest and the internet but I find that some of them don't work into my life as well as they might for someone with kids and a family (I mean, generally a lot of them work since living with boys is like having kids but some do not apply to me). So this is a general list of tips and tricks for your convenience.
 1. Vinegar is your best friend. Once I realized the multiple uses for vinegar I realized I couldn't live without it. This big bottle is about $4 at Walmart (don't quote me on that price). The reason I found so many amazing uses is that I was having a problem with the gnats invading the kitchen and the rest of our house. I needed a cure. Pinterest told me that by mixing vinegar with a small dose of dish soap (I generally do a thin layer on the bottom of the bowl and fill the rest with vinegar) the gnats will be attracted and then trapped. They like vinegar but the consistency of the dish soap traps and drowns them. I'm sure my roommates thought I was crazy leaving bowls of vinegar around but it worked. Vinegar can also be used to clean a smelly sink. Just pour baking soda and THEN vinegar down the drain. Clears that nasty chicken smell right up.


I had an extra shower curtain rod lying around from when I moved out of the dorms. I looped one shower curtain ring through the top of each shower cady. This way they could hang on the bar facing the right direction. I used four more rings to secure one basket to each cady. They hang at the very back of our tiny shower now. It holds all of our shavers, shampoos, and such. It's not as wobbly and I am less likely to bump into it. I don't know about the guys but I'm pretty happy with it.
Those are all my essentials. There are probably a lot more things I could do to make life easier but this is what I have so far. Enjoy!
 1. Vinegar is your best friend. Once I realized the multiple uses for vinegar I realized I couldn't live without it. This big bottle is about $4 at Walmart (don't quote me on that price). The reason I found so many amazing uses is that I was having a problem with the gnats invading the kitchen and the rest of our house. I needed a cure. Pinterest told me that by mixing vinegar with a small dose of dish soap (I generally do a thin layer on the bottom of the bowl and fill the rest with vinegar) the gnats will be attracted and then trapped. They like vinegar but the consistency of the dish soap traps and drowns them. I'm sure my roommates thought I was crazy leaving bowls of vinegar around but it worked. Vinegar can also be used to clean a smelly sink. Just pour baking soda and THEN vinegar down the drain. Clears that nasty chicken smell right up.
2. I am poor. No surprise, I'm in college. SO I don't like to waste or throw away things if I don't have to. I found out via pinterest that mascara doesn't run out as fast as you think it does, it just dries out. My mom told me not to pump my mascara and that will make it last longer. Years of habbit kept me pumping. There's a simple solution: put a few drops of contact solution into your mascara once it dries out. Pump it a few times and let it sit overnight The next day your mascara will be just like new. This can be done 2-3 times before you actually have to throw away your mascara. I've also heard that dried out markers dipped in contact solution and left, with the cap on, overnight will work but I've yet to try it.
3. Jenna Marbles taught me (though I already knew it) that it isn't healthy to wash your hair everyday:http://www.youtube.com/watch?v=FuTcLJybqLM. My problem with not washing my hair every day is that my hair starts to look greasy and dirty after a few hours, especially if I've been at work. I absolutely hate this. Appearance is (almost) everything. I found out that dry shampoo (about $3 at Wal-mart) cures that problem. For second day hair I spray some dry shampoo on the roots of my hair, let it sit for a minute, and then rub it through all of my hair. I almost always wear my hair up if I have second day hair. This way I don't obsess over how my hair looks. Generally, if your hair is up its less likely to look greasy anyways.
4. I used to have way too many pairs of clothes (ask my old roommate). I didn't wear all of them but couldn't bring myself to get rid of anything. What if there was a party where I need to dress up as Tom Cruise in Risky Business?!? This button down shirt dress will come in handy!!! It was a real problem for me. My sister told me a trick one of her co-workers does. Hang all of your hangers facing the wrong way in your closet at the beginning of the season. When you wear and wash them you'll instinctively hang them up facing the right direction. At the end of the season get rid of any clothes that are still facing the wrong way. If you didn't wear them this season it's most likely that you won't wear them again.
5. This last one applies to a lot of people I'm sure! I have a really small shower. Not only that but I share it with two guys. We all have our own shampoos, body washes, etc. The shelf that hangs on the shower head just doesn't cut it for us. I got tired of having to take a shower cady into my own shower. I pay rent, I want ROOM! So I got creative. I went to the dollar tree and picked up a pack of two baskets, another cady, and some shower curtain rings. This is what I set up:

Those are all my essentials. There are probably a lot more things I could do to make life easier but this is what I have so far. Enjoy!
Wednesday, July 18, 2012
Let's Be Thankful
Alright guys, this next project is going to take a while but it's fun and all you need is a deck of cards. This is going to start being more than just a craft/art blog.
As I've said before, I work as a waitress (see how to tip post). Earlier today I noticed that all people did was complain. The people I work with, the people I wait on, everyone. And I understand. Sometimes life is hard. But all this complaining in one place shut me up real quick. Sure I could have joined in (car troubles, GREAT!!) and maybe I did thrown out a few sob stories but I think we all take our lives for granted. I work four doubles a week waiting on people who don't appreciate the hurtles I jump to please them but I have food in my mouth and a roof over my head and that's a lot more than many. I saw a photo on pinterest that really said it all for me:

Basically I want to add some perspective to my life and I think you should do the same.
I saw on pinterest an art journal. Being the crafty girl I am I went ahead and clicked the link. It took me to this woman's mini art journal using a deck of cards. I thought it was so neat that I decided I wanted to make one. So these cards have been sitting in my room for over a week with no inspiration to put anything onto them. Today is that inspiration. I want this deck of cards to be a reminder of how lucky I am to be where I am with who I have. I am going to create a card whenever my mood strikes. I took down some ideas on themes for the cards (yes there's a prompt) but if you don't like them you don't have to use them or you can change them up.
My first step was to decorate a background for a few of the cards. I knew I would want them painted and glued and such so I did that to save time when I'm actually creating something.
 I threw them all into one little box that I wasn't using (courtesy of the Target dollar bins) and can look through them whenever inspiration hits.
So my first prompt (from the original site) is Something you are proud of. I kept the name but changed it to someone. Here's where the blogging actually begins!

It's terrible picture quality. Sorry! No matter how many pictures I take I can't fix it. I really need a new camera (hint hint Christmas gift idea!)
This is a picture of my little brother (aww I know!). He's older now but this is the oldest school photo I have of him. I'm sure he has never thought of me as being proud of him but I am, so very proud. I'm always telling him not to mess up his life and scolding him for the little things but I am so jealous of where he is compared to where I was when I was his age. He has done so well and he excels in nearly all he tries in. When we were young we went through a divide in our family and I thought I had it hard by being left out. Getting older I realize it's so much harder being the rope than tugging on one end and I am just so proud of all that he is and will become.
Some things I made sure to include on this was a number (1) so I could keep my cards in order. This isn't necessarily important but I would prefer them that way. I also wrote the prompt so I knew what the card was about (there are going to be 52 of these so it might get confusing).
If you're looking for something to do or a way to add a little reminder of things to be thankful for or even something to cheer you up on your bad days then go ahead and grab a deck of cards and join me in creating a mini art journal.
As I've said before, I work as a waitress (see how to tip post). Earlier today I noticed that all people did was complain. The people I work with, the people I wait on, everyone. And I understand. Sometimes life is hard. But all this complaining in one place shut me up real quick. Sure I could have joined in (car troubles, GREAT!!) and maybe I did thrown out a few sob stories but I think we all take our lives for granted. I work four doubles a week waiting on people who don't appreciate the hurtles I jump to please them but I have food in my mouth and a roof over my head and that's a lot more than many. I saw a photo on pinterest that really said it all for me:

Basically I want to add some perspective to my life and I think you should do the same.
I saw on pinterest an art journal. Being the crafty girl I am I went ahead and clicked the link. It took me to this woman's mini art journal using a deck of cards. I thought it was so neat that I decided I wanted to make one. So these cards have been sitting in my room for over a week with no inspiration to put anything onto them. Today is that inspiration. I want this deck of cards to be a reminder of how lucky I am to be where I am with who I have. I am going to create a card whenever my mood strikes. I took down some ideas on themes for the cards (yes there's a prompt) but if you don't like them you don't have to use them or you can change them up.
My first step was to decorate a background for a few of the cards. I knew I would want them painted and glued and such so I did that to save time when I'm actually creating something.

So my first prompt (from the original site) is Something you are proud of. I kept the name but changed it to someone. Here's where the blogging actually begins!

It's terrible picture quality. Sorry! No matter how many pictures I take I can't fix it. I really need a new camera (hint hint Christmas gift idea!)
This is a picture of my little brother (aww I know!). He's older now but this is the oldest school photo I have of him. I'm sure he has never thought of me as being proud of him but I am, so very proud. I'm always telling him not to mess up his life and scolding him for the little things but I am so jealous of where he is compared to where I was when I was his age. He has done so well and he excels in nearly all he tries in. When we were young we went through a divide in our family and I thought I had it hard by being left out. Getting older I realize it's so much harder being the rope than tugging on one end and I am just so proud of all that he is and will become.
Some things I made sure to include on this was a number (1) so I could keep my cards in order. This isn't necessarily important but I would prefer them that way. I also wrote the prompt so I knew what the card was about (there are going to be 52 of these so it might get confusing).
If you're looking for something to do or a way to add a little reminder of things to be thankful for or even something to cheer you up on your bad days then go ahead and grab a deck of cards and join me in creating a mini art journal.
Monday, July 9, 2012
Cheap Art
This was a pretty cool project but I didn't have canvas and didn't want to buy any so I substituted a large (ish) piece of cardboard instead. So first I painted it whatever color I wanted. I chose a new purple I'd just found in the clearance aisle at Wal-mart.
 I have been collecting the empty toilet paper rolls from the bathroom each time we run out. I have been seeing tons of projects that look easy and cute (like this one). Let me just say it's super easy for me to get the toilet paper roll because I am the only one who knows how to change it (apparently), but if you live with women then you should let your roomies know to keep the rolls. This project only took two rolls but I'm still saving them for whatever projects I come up with next. I flattened the rolls and placed a ruler on top then made a mark at even intervals depending on how thick I wanted my project. It's kinda hard to see but its .5 inch red marks.
 Then I cut both rolls into strips. I formed my design on the ground first before hot gluing the pieces together. Then I painted them a second color that I liked with the purple.
 Once all of my pieces dried I hot glued the pieces together in the places they belonged. With pieces like the flower the glue will dry before you can get glue on all of it so I placed glue on the five ends.
Once the project was done I nailed it to the wall placing the nails in places that aren't noticeable like in the middle of the flower and the corners of the petals.
 And it's finished! I got the idea from one I saw online. There are many more that I have liked so I will probably do some more. Like I said I think this would look way cooler on canvas. I would have loved to make it huge like in the example that I saw. I've got a lot more projects on the way so keep checking. I'm going to start a weekly art journal soon that will take about ten minutes a week. SO get a deck of cards!! and come back soon!


Once the project was done I nailed it to the wall placing the nails in places that aren't noticeable like in the middle of the flower and the corners of the petals.

Saturday, July 7, 2012
Always Waiting
So this post is not going to be crafty but don't worry I've got a list of things to blog about. This is more of a "You need to learn this" post. Its about how to tip you wait staff. Now I'm sure many of you think you know how to do this....but you probably are wrong. No offense.
Let's just start off by saying I am a waitress so this applies to me and that's why I think its important. It is very possible and probable that you, your children, and your grandchildren will at some point have a waiting job as well. Therefore it applies to you too.
I know that the general rule to go by is 10-15%. This rule sucks. At my job we are required to claim 12% of our total sales as tips. So obviously if everyone tips 10% I won't make that line. Which means I will need a managers approval to claim the tips that I did make and it will look like I didn't claim all of my tips. Now I'm not saying I'm a bad waitress. There are many times where I make more than that 10-15% but it's annoying when one or two tables ruin my whole tip percentage. If your waiter/tress does a good job, tip them the most that you think they deserve. Don't be cheap. As a waitress I make $2.15 an hour. How much do you make? because I'm pretty sure it's more than that. You can argue that there are nights when I make more than minimum wage, which is true. But let's be honest, with this economy not as many people can afford to go out to eat. There are far more days where I don't even make minimum wage because it's slow and there aren't a lot of customers.
Now, I want to touch on a stereotype. Two actually. Old people and young people. The stereotype is that you suck at tipping. One dollar does not a tip make my old friends. The wait staff dreads when you come in and dreads having you as a table. Change this stereotype. Prices have gone up. I know you've noticed. This means that the tip should go up as well.
Here is something that particularly irks me. If you have a coupon, or kids eat free, tip as if you didn't. At my job we have a night where kids eat free. So it's annoying when a table of 6 comes in, 4 of which are kids, so their bill that would be $60 is only $20 and they tip you for the $20. I did $60 worth of work for you especially since kids tend to take more patience so please tip accordingly.
No one waits because they like it because no one likes it. It isn't a fun job and people aren't fun to wait on. I know at some point you've had to deal with a mean/bad/annoying customer. That's almost a daily thing for a waiter especially at a popular restaurant. So tip well from now on.
 Very good movie by the way.
Let's just start off by saying I am a waitress so this applies to me and that's why I think its important. It is very possible and probable that you, your children, and your grandchildren will at some point have a waiting job as well. Therefore it applies to you too.
I know that the general rule to go by is 10-15%. This rule sucks. At my job we are required to claim 12% of our total sales as tips. So obviously if everyone tips 10% I won't make that line. Which means I will need a managers approval to claim the tips that I did make and it will look like I didn't claim all of my tips. Now I'm not saying I'm a bad waitress. There are many times where I make more than that 10-15% but it's annoying when one or two tables ruin my whole tip percentage. If your waiter/tress does a good job, tip them the most that you think they deserve. Don't be cheap. As a waitress I make $2.15 an hour. How much do you make? because I'm pretty sure it's more than that. You can argue that there are nights when I make more than minimum wage, which is true. But let's be honest, with this economy not as many people can afford to go out to eat. There are far more days where I don't even make minimum wage because it's slow and there aren't a lot of customers.
Now, I want to touch on a stereotype. Two actually. Old people and young people. The stereotype is that you suck at tipping. One dollar does not a tip make my old friends. The wait staff dreads when you come in and dreads having you as a table. Change this stereotype. Prices have gone up. I know you've noticed. This means that the tip should go up as well.
Here is something that particularly irks me. If you have a coupon, or kids eat free, tip as if you didn't. At my job we have a night where kids eat free. So it's annoying when a table of 6 comes in, 4 of which are kids, so their bill that would be $60 is only $20 and they tip you for the $20. I did $60 worth of work for you especially since kids tend to take more patience so please tip accordingly.
No one waits because they like it because no one likes it. It isn't a fun job and people aren't fun to wait on. I know at some point you've had to deal with a mean/bad/annoying customer. That's almost a daily thing for a waiter especially at a popular restaurant. So tip well from now on.

Monday, July 2, 2012
Toga Toga!!
My boyfriend is apart of a fraternity on campus. Towards the end of the year the fraternity had a Toga party. He left me up to deciding on the togas. I decided to go on the "famous couples in history" route and play off our whole boyfriend/girlfriend thing since many of the guys and their dates weren't actually couples. I had a whole list including mickey/minnie, knight/princess, classic caveman/woman but finally my friends helped me decide on this:
 Can you see it? Most people got the right show. Pebbles and Bam Bam!! Dorthy and Tin-man were a close tie. I'll use them eventually.
So here's how I did this awesome costume for pretty cheap.
Pebbles
Pebbles was obviously pretty easy. She actually has a lime green dress with black triangles like Bam Bams but I figured I could get away with white circles. I can't remember how much I bought but I ended up only using half. I cut the fabric in half length wise and sewed two ends together to make it longer. I decided on my length by, in the store, estimating how much fabric would be needed to wrap around me, I should have bought half as much. To wrap the dress I started by hanging a piece over my shoulder with the short end reaching just past my waist in the front and the long part hanging in the back. I then started to wrap starting at the top and going around to the front, over the short end, and continued wrapping down my body until I got my desired length. I overlapped for most of the fabric. I tucked the end up (which you can see in the picture on your left) and used a safety pin to hold it in place. Any places that were loose also got a safety pin. I used a shell necklace and a felt dog toy as accents to the outfit. To put the bone in my hair I put it up in a very high ponytail. I took two pieces of hair and pulled them forward placing the bone up against the hair-tie. Then I wrapped one piece of hair on one side of the bone and safety pinned the hair in the back. I did the same on the other side.
Bam Bam
Bam Bams was way harder. I couldn't find any fabric with black triangles so we bought just plain fabric. I bought a piece of sale fabric in black and cut it into little black triangles. That's right. I put those triangles on by hand. I didn't sew them thank god. I bought fabric no stitch gel and used that to quickly apply random triangles everywhere. I also applied them to the hat. The only reason the hat is even apart of the outfit is because my boyfriend has a thing for hats. Bam Bam does have a hat but it's not a necessity. Wrapping Bam Bam was pretty much the same as Pebbles. More chest is shown so wrapping doesn't have to start as high. As you can see the shoulder depends on the personal preference. My boyfriend wanted his on the left to cover some scars.
I probably spent 2-4 hours making these costumes and another hour putting them on both of us. Now I love KU but it's my luck that they made it into the basketball Championships about 30 minutes after we got our togas on so no one stayed for the party. And they couldn't even win the Championship for goodness sake! That makes me very angry. If they had won it all I wouldn't be as mad. I will definitely reuse these costumes. This wrapping technique held up way better than many of the others I saw at the party. People were constantly having their togas fall off. Also, it looks like all we have on are togas. Underneath I am wearing a strapless shirt and spandex shorts. Plenty of girls did the same but theirs could be seen. I've also seen togas in a halter style using a similar technique. Rather than draping behind one should go back over the other shoulder and then start wrapping.
Toga Toga Toga!!!
Saturday, June 30, 2012
My kitten made me do it...
This is not going to be a crafting post. Sorry to disappoint.
So you may or may not have heard that my boyfriend and I recently adopted a kitten from the Lawrence Humane society (Go adopt yours: http://www.lawrencehumane.org/). We had trouble on deciding which animal and of what species to adopt. He fell in love with a grey tabby named Tom. Tom was a five month old, active, playful kitten. He was also $75. Obviously Tom was not meant for us. We went on a Thursday so cats older than 6 months are free plus you receive a free collar, a free bag of food, and the cat is micro-chipped for free so it can be tracked if ever lost (go here http://www.lawrencehumane.org/ or find your humane society).
I am not one to jump into a decision. Sure, I jumped into getting a pet but deciding on the specific one was tough. Especially after I saw Dozer. Dozer is a dog that was left by his owners on the side of the road. Not only that but Dozer was left by people who had previously adopted him from a Humane Society. He looked so sad. It reminded me of my first puppy, Romeo.
After settling that no, we weren't going to buy Tom or Dozer since both cost $75, we had to choose between two very similar cats. The problem with choosing is that we each chose one cat and wouldn't budge. We walked around trying to decide and then I found her. We had just walked into Cat-topia where all the cats roam free and the cutest of little black cats walked by. It didn't take much time and we were on our way home with our Phoenix. We kept the name that the Humane society gave her.

So this lovely story of how the newest member of our household came to be brings me to how my cat drove me crazy. Phoenix is fully housebroken. She was cleared with a clean bill of health at her check up. So you can image my annoyance that she continually goes to the bathroom on the carpet in front of her litter box. This has been going on for about a week now. All we need to do is make it to Monday and then she is going to the vet, and this is why. Her litter is clean and new. We thought that maybe she was mad that we kept her locked in our room while we weren't at home so now we've been leaving the door open. Still using the carpet. She also has been dragging her butt on the carpet which has been going on for longer than a week so maybe she is trying to tell me something. Either way it's not her fault. I understand. But after working a double shift and then coming home to her presents on the carpet for the second time today you can imagine my annoyance. I snapped. I came home, saw it, got pissed. As soon as the carpet was clean I nailed a towel to the floor. Now you might say "why on earth did you NAIL a towel down??". Well here's my reasoning. I've put a towel down before and she just goes on the towel which is great. Exactly what I wanted. The thing about Phoenix is that she isn't dumb. She's actually a really smart kitty. She knows that we'll be mad. My boyfriend is just as annoyed with her. So she covers it up like I won't notice. She pulls rugs, towels, nearly anything she can over it to cover. She even pulled my hair straightener of the dresser by it's cord once (the horror!!). As you can tell I am annoyed and I refuse to deal with it anymore. So I nailed a towel to the floor. I have no advice other than, if your cat is dragging it's butt on the floor take it to a vet.
Friday, June 29, 2012
Rental Horrors
This is the project that I am the most proud of and I get to see it every day!
Recently, my boyfriend and I began renting a room out of a house with other college kids. Specifically boys. Before we moved in there were five guys (burgers and fries?) living here. So, needless to say, this place was disgusting (sorry if any of you are reading this).
When we moved into the house we noticed that everything is pink. Ugly pink. The rooms, the bathrooms, the kitchen cabinets. It's so strange. I guess the story is that the owner's of the house let their two little girls paint their rooms and the bathroom whatever color they wanted. And apparently they didn't help them paint it, at all. I have no clue what happened to the kitchen but that explains the paint job in the rooms. The nails and plug-in covers were all painted the same pink. The air vent on the wall was pink too. The worst part? Not only did the girl who lived in our room paint over tape but she painted over dust. Actually, to be more accurate, a spiders nest. I got the privilege of cleaning up dead baby spiders that were trapped until their death in their own egg sack. Aren't rental horror stories fun?
Anyways, I had this vision. I decided to get crafty. The room is mostly for my boyfriend so I decided on the colors of beige and navy blue. It's a pretty dark navy blue. We spent a few days painting the entire room beige. Three walls took two coats. I wasn't sure what to do about the ceiling. I didn't want to paint the whole ceiling but the girls didn't tape anything when painting so there was a lot of pink on the ceiling. We decided to just paint over the pink with beige since it wouldn't be THAT noticeable from afar.
Okay, enough talk. Here's the fun part. It'll be easier to show you.
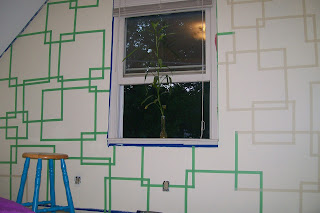 I did this (by myself) while my boyfriend was at work. I intended to surprise him with it since he had no clue what I was trying to describe to him. It was pretty funny. Every time someone would ask about the paint job he would describe it to them wrong. I would correct him and then the next time he tried to describe it he'd get it wrong in a completely different way. I digress. Like I said, we painted all of the walls beige but, since most of this wall was going to be covered up, we only did one coat on this wall. I ran out of tape half way through the wall and had to walk (my boyfriend had my car for work) to the hardware store (that ended up being closed) and then Dollar General to get tape. It didn't matter if it was the same type of tape, just the same thickness. I was worried that the tan tape, which wasn't painters tape, wouldn't work as well but it worked just fine. All of these boxes were free handed so some of them are a little crooked but it kind of added to the look, like it is supposed to look that way.
After making all of the boxes I used a roller and painted blue over the entire wall. I used two coats to make sure it covered. This whole project didn't take that much time but I had to wait for the paint to mostly dry before peeling off the paint (in case I needed to paint over a few places). I think this is the perfect accent wall for our little room. This wall is the biggest of all of the walls and isn't broken up by doors or the closet. You can kind of see in the left corner of the picture that our ceiling slopes so all of our other walls are short.
 This is the end project and my boyfriend. Both cleaned up nicely don't you think? We painted all of the other baseboards blue as well as the doors because, again, they were all pink. That explains why the window, which wasn't pink, is also blue. It really doesn't make sense that the only thing that wasn't pink was that window. All well. My next painting project is the bathroom which is a slightly less disgusting color of pink but I think that the left over beige will cover it since it's so small.
Some cool alternatives to this project would be diamonds rather than squares. I am a big fan of accent walls. Stripes can also be made. I am a fan of many different sized stripes on one wall but that's just me. Any two colors can be used. Always do a light and a dark or a neutral and a light/dark. Never two dark colors, because the room will be dark and depressing and never two brights, because it will be blinding. One day I want to do a brown diamond wall in my living room. I will probably use beige again but have orange accents throughout the room.
Recently, my boyfriend and I began renting a room out of a house with other college kids. Specifically boys. Before we moved in there were five guys (burgers and fries?) living here. So, needless to say, this place was disgusting (sorry if any of you are reading this).
When we moved into the house we noticed that everything is pink. Ugly pink. The rooms, the bathrooms, the kitchen cabinets. It's so strange. I guess the story is that the owner's of the house let their two little girls paint their rooms and the bathroom whatever color they wanted. And apparently they didn't help them paint it, at all. I have no clue what happened to the kitchen but that explains the paint job in the rooms. The nails and plug-in covers were all painted the same pink. The air vent on the wall was pink too. The worst part? Not only did the girl who lived in our room paint over tape but she painted over dust. Actually, to be more accurate, a spiders nest. I got the privilege of cleaning up dead baby spiders that were trapped until their death in their own egg sack. Aren't rental horror stories fun?
Anyways, I had this vision. I decided to get crafty. The room is mostly for my boyfriend so I decided on the colors of beige and navy blue. It's a pretty dark navy blue. We spent a few days painting the entire room beige. Three walls took two coats. I wasn't sure what to do about the ceiling. I didn't want to paint the whole ceiling but the girls didn't tape anything when painting so there was a lot of pink on the ceiling. We decided to just paint over the pink with beige since it wouldn't be THAT noticeable from afar.
Okay, enough talk. Here's the fun part. It'll be easier to show you.

After making all of the boxes I used a roller and painted blue over the entire wall. I used two coats to make sure it covered. This whole project didn't take that much time but I had to wait for the paint to mostly dry before peeling off the paint (in case I needed to paint over a few places). I think this is the perfect accent wall for our little room. This wall is the biggest of all of the walls and isn't broken up by doors or the closet. You can kind of see in the left corner of the picture that our ceiling slopes so all of our other walls are short.

Some cool alternatives to this project would be diamonds rather than squares. I am a big fan of accent walls. Stripes can also be made. I am a fan of many different sized stripes on one wall but that's just me. Any two colors can be used. Always do a light and a dark or a neutral and a light/dark. Never two dark colors, because the room will be dark and depressing and never two brights, because it will be blinding. One day I want to do a brown diamond wall in my living room. I will probably use beige again but have orange accents throughout the room.
Wednesday, June 27, 2012
Dream Big
So this is a project that I did for school. The one I made isn't very crafty but I really liked the idea and have a few ways that it could be made more appealing to the eye so I'm ognna go ahead and share it.
This is my dream board:
 This would be a good project for a rainy day or with kids. The way we did it in class was to make a list of 5 dreams that you hope to complete within the next year, 5 within the next 5 years, and then 3 for the next 10. I really didn't like the "within a year" part because I didn't really have anything important I wanted to do. I used things like go to college (which is important but I knew I would do it already), get clear skin, get healthy, and things like that. Honestly, I didn't even attempt these goals. They just weren't that important to me. It's the other ones that meant a lot. I've had dreams of traveling and a son for a long time. It's was important to me that they go onto my dream board. All of my pictures were cut out of magazines and glued onto a piece of constriction paper. My teachers laminated it and it hangs on my wall today.
This project is pretty plain. So I came up with some ways to make it look prettier.
1. I have seen online where people have taken cookie sheets, spray painted them, and then used them as a magnet board. The same idea could be used for this. Remember, the idea is your dreams from now so don't change the dreams out. Just add on new ones as they develop.
2. A shadow box from Hobby Lobby would be a great idea. This way not only pictures but actual objects could go into your dream board (box). If I had made a shadow box then I would of included a miniature Eiffel tower since I have always dreamed of going to Paris. Use scrapbook paper to decorate the background of the shadow box.
3. Goodwill has a lot of large, cheap picture frames. Buy one and remove the picture as well as the glass from the frame. This leaves the cardboard backing to the frame. Cover the cardboard with scrapbook paper and attach the pictures of your dreams. It's the same idea as what I made, just better looking.
Basically all of these have the same idea: give yourself a visual of your dreams to see daily. This makes you remember them each day and will most likely cause you to think about how to achieve them. For instance, lately when I've seen my board, I have thought about my trip to Washington that I am working towards. I hope to be at the Presidential inauguration. No matter what your dreams are just give yourself a daily reminder to help them along. Don't let yourself forget about them.
This is my dream board:

This project is pretty plain. So I came up with some ways to make it look prettier.
1. I have seen online where people have taken cookie sheets, spray painted them, and then used them as a magnet board. The same idea could be used for this. Remember, the idea is your dreams from now so don't change the dreams out. Just add on new ones as they develop.
2. A shadow box from Hobby Lobby would be a great idea. This way not only pictures but actual objects could go into your dream board (box). If I had made a shadow box then I would of included a miniature Eiffel tower since I have always dreamed of going to Paris. Use scrapbook paper to decorate the background of the shadow box.
3. Goodwill has a lot of large, cheap picture frames. Buy one and remove the picture as well as the glass from the frame. This leaves the cardboard backing to the frame. Cover the cardboard with scrapbook paper and attach the pictures of your dreams. It's the same idea as what I made, just better looking.
Basically all of these have the same idea: give yourself a visual of your dreams to see daily. This makes you remember them each day and will most likely cause you to think about how to achieve them. For instance, lately when I've seen my board, I have thought about my trip to Washington that I am working towards. I hope to be at the Presidential inauguration. No matter what your dreams are just give yourself a daily reminder to help them along. Don't let yourself forget about them.
Monday, June 25, 2012
Shoes! Shoes! Shoes!
Alright, so here is another project that I absolutely loved!!! A while back my sister was getting rid of a lot of her clothes and such. First, she came to me with her unwanted clothes to see if I wanted any. She had these heels.


What you'll need:

1. The first step to adding some color to your heels is to use rubbing alcohol to clean the bottom of the shoes. My shoes have ridges in the bottom so I made sure I was extra careful and cleaned them well.
2. The second step is to cover the bottom of your shoes in a layer of white nail polish. It doesn't have to be thick it just needs to cover the area you want to be colorful. I used a regular paint brush to cover the bottom quicker. This ruined my brush. The tutorial said that nail polish remover would get rid of it but that's not true apparently. Luckily I have cheap brushes.

3. Once the white is completely dry you can begin to cover with your second color of nail polish. This will be your final color. You will probably need two or three coats to cover it completely. Remember that the shoes will be viewed from afar so it's not super important that the color is thick.

This is my end result. I think they're super cute now. I chose pink because it matches most of my "Going out" outfits. It also was my most popular nail polish color and this project takes a good portion of the bottle so I wanted to use something I have a lot of. There were some spots on the underneath of the shoe where paint got onto the black that I didn't want to paint. I just used a black sharpie (!!!) to cover up these spots as well as any scuffs. The shoes look great now!
My boyfriend James has been bugging me to write a blog post about him. So I'm just going to quickly include that he is the weirdest guy I have gone out with but also the most interesting. He changes the words to the music of songs and sings to me. They don't rhyme and hardly make sense but its cute. We have a kitten named Phoenix and, before we got her, he promised he would clean out the litter box every day and that I would never have to if we got a kitten. Now that we have her that's completely changed. He complains every time I ask him too, but it's worth it because she's pretty great too. That's pretty much all I have to say. Just trying to embarrass him as any good girlfriend would.
Sunday, June 24, 2012
Add some class to that....
This next project I absolutely loved. Ever since I was a kid I've had a problem with long legs and a small waste. Now how could this be a problem you might say? It's a hell of a thing to complain about. With jeans it's not so bad because I can buy jeans in long but shorts are ridiculous. As a kid they weren't so bad but now fashion companies are responding to the skankiness of my generation (I apologize on our behalf) and shorts are getting shorter and shorter. When you have a small waste and long legs the shorts look even shorter. Every year it gets worse. I hate it. Shorts that are supposed to be mid thigh are my shorts these days. Anyways, until recently I've been either selling or collecting my jean shorts as my legs get longer and my shorts look shorter. Now, I'll be honest, at some point to high school I did succumb to the flaw of my generation and my shorts were pretty short, but they always covered. I grew out of it and ended up throwing away or selling a bunch of shorts. Since I got rib of so many I barely have any now and summers are hot. Rather than throw away the few pairs of shorts I have left, I found a picture on pinterest that will make shorts that are only a little too short a little longer.
 When I found this link online it was only a link to a picture of shorts. I've put off wearing these shorts for a long time because of how short they are. The lace has added about an inch to them. I wish I could unroll them but they are sewn at the hems and I don't know enough about sewing to undo that.
As I've said before I don't have a sewing machine which makes this difficult. I do have no sew stitch from a toga project I did a few months back. I bought this liquid stitch at Hobby Lobby. So what I did is I turned my shorts inside out. The lace I used was identical all around (same pattern, as most laces are) so I found a spot on it that would be where the edge of my pants reaches on the lace so that the lace would be even all around. I applied a line of no sew gel and spread it out with my finger. After placing the lace on the gel I used some pins to keep the lace in place until it dried. I did this all around to both legs of the shorts. Then I took my mini sewing kit. I hand stitched at the places that probably wouldn't stay on just the no sew gel like the inner and outer thighs. Then I put a few security stitches in random places just in case they started to fall apart the first time I wore them. This way they wouldn't look ridiculous if that happened and they would still look together until I could get home. They didn't fall apart. The no sew stitch gel is machine washable. You'll need to let the gel dry completely. I let mine sit out 24 hours before I wore them even though it doesn't take that long to dry completely.
I only did this because I didn't have a sewing machine. If you have a machine I highly recommend doing it that way so that there isn't a chance that the lace will fall apart. You will also want to sew (by machine or hand) the two ends of the lace together once they wrap around. I had the lace begin and end on the inner leg so that the stitches and ends couldn't be seen. The lace I chose wasn't very wide (maybe 1.5 inches). I'd base the lace width on how much you want to add to your shorts. I also chose off-white lace because I think it will match more and give my outfits a country feel.
Saturday, June 23, 2012
Craftastic Hoarding
So I guess one of the things that makes me so crafty is that I hoard crafts. Not that it doesn't also take some artistic ability to connect pieces and make something but hoarding is definitely part of it. Over the years I have hoarded everything. I still have some mosaic tiles that I found in the art supply room in middle school. I don't do this on purpose but there is always a little voice, that I listen to, that says "hey that might come in handy one day. You might NEED that" so I keep it. Now, some things do come in handy but many just sit in my craft box.

Over the years I have collected feathers from failed projects, paints of the same exact brand and shade (past and present me both have great taste), and scraps of fabric as well as many other odds and ends. While all of this is a large part of my craft creating collection, I think that there are some essentials that everyone trying to craft should have.
1. The very first and most important is a hot glue gun. From the beginning of crafternity the hot glue gun has been the center of the craft universe. When I lived at home I used my mom's. Soon after moving into college I realized I couldn't function without one. Elmers or super glue just aren't my thing. So I went out and bought my very own glue gun. I thought they would be expensive but turns out Hobby Lobby has mini glue guns for around $5 which, though I am poor, is in my budget. Definitely the most important part of my crafting. I use it for nearly every project.
2. While not as important for crafting but still important in daily life, I think the sewing kit deserves to make this list.
 This is just a small sewing kit that my boyfriend picked up at Walmart for me for Mother's Day (proud mom of three goldfish). It was mostly a joke between us but still a good gift since I needed a kit. It comes with pins, needles, threads, and all the other essentials to sewing and was only $5. It's no sewing machine and could never replace one but has been helpful thus far. There are a lot of DIY projects I would like to do that involve a lot of sewing but, until I get my own sewing machine, this will suffice.
3. I don't have a lot to say about this next item but paint brushes are important for the obvious reasons: to paint anything other than your nails (I have a secret for that). I bought a large pack of assorted brushes at Hobby Lobby for probably $5 (it was a while ago so I may be wrong on the price).
4. Number four is important to me and my crafting but may not be a necessity to others. I love sharpies. Of any and every color. I have used them for a lot of things and I think that they are very useful, especially for things that would be hard to paint (mostly small things like lines). When I was a preteen I used to carry a Sharpie with me wherever I went. I once drew in (on) a JCPenny elevator. It wasn't a bad drawing either, pretty artistic (haha). There was also a long time that I would write on my shoes whenever I felt the need (no idea why I needed to write on my shoe). So, anyways, sharpies are important to my crafts. I like to doodle.
5. This is probably only going to be a list of five important things for your magic craft box so last but not least is the magic craft box itself. Mine is just a green tub I bought at the dollar store, though it has been transported over the years to several different containers. For Christmas last year I received a carrying case to sort my crafts so I actually have two bins now for my crafts. In my craft box I have pictures that don't yet have a home, tissue paper from presents, buttons, old artwork, and lots of other odds and ends. Like I said, any little thing that you might want to keep can go into this box. I have one cherry clip-on earring because it's pair was used in a BFF frame for my best friend from high school. It's important to me so it goes in the box. Anything you might want to use one day, that the voice says "don't get rid of that", goes into this box. Without it, all your other items are useless...
Obviously this is just my opinion on crafts but it's worked for me thus far. Get crafty this weekend!

Over the years I have collected feathers from failed projects, paints of the same exact brand and shade (past and present me both have great taste), and scraps of fabric as well as many other odds and ends. While all of this is a large part of my craft creating collection, I think that there are some essentials that everyone trying to craft should have.
1. The very first and most important is a hot glue gun. From the beginning of crafternity the hot glue gun has been the center of the craft universe. When I lived at home I used my mom's. Soon after moving into college I realized I couldn't function without one. Elmers or super glue just aren't my thing. So I went out and bought my very own glue gun. I thought they would be expensive but turns out Hobby Lobby has mini glue guns for around $5 which, though I am poor, is in my budget. Definitely the most important part of my crafting. I use it for nearly every project.
2. While not as important for crafting but still important in daily life, I think the sewing kit deserves to make this list.

3. I don't have a lot to say about this next item but paint brushes are important for the obvious reasons: to paint anything other than your nails (I have a secret for that). I bought a large pack of assorted brushes at Hobby Lobby for probably $5 (it was a while ago so I may be wrong on the price).
4. Number four is important to me and my crafting but may not be a necessity to others. I love sharpies. Of any and every color. I have used them for a lot of things and I think that they are very useful, especially for things that would be hard to paint (mostly small things like lines). When I was a preteen I used to carry a Sharpie with me wherever I went. I once drew in (on) a JCPenny elevator. It wasn't a bad drawing either, pretty artistic (haha). There was also a long time that I would write on my shoes whenever I felt the need (no idea why I needed to write on my shoe). So, anyways, sharpies are important to my crafts. I like to doodle.
5. This is probably only going to be a list of five important things for your magic craft box so last but not least is the magic craft box itself. Mine is just a green tub I bought at the dollar store, though it has been transported over the years to several different containers. For Christmas last year I received a carrying case to sort my crafts so I actually have two bins now for my crafts. In my craft box I have pictures that don't yet have a home, tissue paper from presents, buttons, old artwork, and lots of other odds and ends. Like I said, any little thing that you might want to keep can go into this box. I have one cherry clip-on earring because it's pair was used in a BFF frame for my best friend from high school. It's important to me so it goes in the box. Anything you might want to use one day, that the voice says "don't get rid of that", goes into this box. Without it, all your other items are useless...
Obviously this is just my opinion on crafts but it's worked for me thus far. Get crafty this weekend!
Friday, June 22, 2012
Poor College Crafts
The summer before I left for college I went crazy and spent a lot of money, on a lot of things. My family jokes about the floor lamp I bought without a reason other than it was $4 (it stands in my living room today, great investment). I was going to college and I didn't know what I'd need. I bought a lot of things I just didn't and a lot of things that while, yes useful, were UGLY. One such thing is my Goodwill table.
Let me just say that Goodwill is a godsend. I spend a lot of time trying to save my money. Buying what I need for as close to nothing as possible. I'm sure one day I will come an extreme coupon-er like I've seen on TV. Every year for Christmas I buy all my presents (family gives me money to shop for myself) from Goodwill. I want the clothes and jeans are too expensive, but I digress.
That summer before college I was at Goodwill and found a side table. It's cardboard but sturdy. It was also purple. Ugly purple. This is one of those side tables that can be bought at Target for $15. I got it for $1.50. Another reason why I love Goodwill: Used doesn't mean in bad shape (but I wouldn't buy couches there). Purple is not one of my favorite colors so I decided to get crafty and change it. Spray paint has become my best friend.

Right now I don't have batteries in my camera so I'm posting past crafts. I didn't get this idea from pinterest but I have seen it on there.
Let me just say that Goodwill is a godsend. I spend a lot of time trying to save my money. Buying what I need for as close to nothing as possible. I'm sure one day I will come an extreme coupon-er like I've seen on TV. Every year for Christmas I buy all my presents (family gives me money to shop for myself) from Goodwill. I want the clothes and jeans are too expensive, but I digress.
That summer before college I was at Goodwill and found a side table. It's cardboard but sturdy. It was also purple. Ugly purple. This is one of those side tables that can be bought at Target for $15. I got it for $1.50. Another reason why I love Goodwill: Used doesn't mean in bad shape (but I wouldn't buy couches there). Purple is not one of my favorite colors so I decided to get crafty and change it. Spray paint has become my best friend.

Its actually sideways here but still gets the point across. This is the top. I started off by spray painting the table yellow since it is my roommate and mine's favorite color. I considered her while creating this since I didn't know her yet and didn't want to seem inconsiderate. The legs were sprayed as well. I made the mistake of spraying this on the cement (though I don't regret it) because I didn't want the grass to stick/mess up the paint.
It took about 10 minutes for the paint to dry. While I was waiting on that I went into the house and drew some stars on a piece of poster board. I also wrote the word "Believe" in blue (I will explain what happened in a moment). I cut all of it out. I then went back outside. I placed the "Believe" on the table and used a few pieces of scotch tape to secure the poster then began to spray paint in blue.
When it comes to these projects (and everything else) I am impatient so I started to spray paint the red stars before the blue had dried. When I finished with the stars and removed the paper some of it (the paper) had dried to the table hence the weird spots and the absence of "Believe". I tried to scrape the paper off but that didn't work so well. Essentially I just sprayed the entire bottom to get rid of the "believe" word. Because the table is made of cardboard the paint doesn't scratch off (easily).
I was going for the college, inspirational look. I have seen this same thing done with other stencils (flowers, hearts, trees, children's hand prints). Two of these tables pushed together make a good coffee table. I've seen this with half a stencil on one table and the other half on the other table.
Right now I don't have batteries in my camera so I'm posting past crafts. I didn't get this idea from pinterest but I have seen it on there.
Thursday, June 21, 2012
Here's a Tack to Pin That
The Beginning
A friend told me about pinterest.com. She showed me an app on her iphone (part of me envies this app and the other is thankful I don't have it. I would never look away from it). Slowly, or not so slowly, I have become nearly addicted. My drug of choice: DIY & Crafts. I can't help it. I have always been an arts and crafts kind of girl so imagine my excitement when finding a site practically dedicated to doing stuff. All kinds of stuff! Arts, crafts, food and pastries, activities, anything! Obviously, I instantly dumped my stubleupon account and took hold of the pinterest bandwagon. Now I can't get off. Look at this! I'm even devoting a blog to the site! Now that's dedication.
Reasoning
My thing, how I really learn, is mimicking. That's my problem with pinterest (one of very few). Some pins don't go anywhere. When a youtube video is pinned that's just dandy but I'm not interested in the hair tutorials (because, frankly, my hair will never behave as well as Candy's does for her whatchamacallit hairstyle). I'm interested in the make-your-own dinnerware and all those bracelets. I want to do something with my hands that I can look at daily because I don't have the time or patience to mess with my hair, a ponytail will suffice. I want something to be proud of. But again some things are without directions or aren't in English (I should have stayed awake in High School Spanish). So, while I may be frustrated by the lack of help, I'd like to let others know how I'm doing what i am and how I've done what I have with so little (specifically very little $$$).
I'm not going to schedule my blogs and I won't post one about a project today. Some blogs will be short about small projects, some might include several projects, some will be one long project. All projects are open to interpretation and can probably be done differently and even better. Most projects will be my first time and won't be repeated.
ENJOY
-KMOlogy
Subscribe to:
Posts (Atom)